原本请戳这里。
健康检查 (OSTF) 的贡献者手册 – 翻译
什么是健康检查或 OSTF?
Fuel 的界面上有一个称为“健康检查” (Health Check) 的标签。但是在开发团队中,有一个确定的缩写 – OSTF,即 OpenStack Test Framework。这两者其实是一样的。为了简单,本文档会使用更广为接受的术语 OSTF。
OSTF 的主要目标
当 OpenStack 通过 Fuel 部署完成后,首先要了解它是否成功以及是否能够使用,这是非常重要的。OSTF 提供了一套健康检查的套件 – 完整性测试 (sanity)、冒烟测试 (smoke)、高可用 (HA) 以及额外组件的测试,它们能够通过典型的条件去检查所有系统组件的适当操作。其中有一些 OpenStack 场景验证的测试和其他特定测试用于验证 OpenStack 的部署是非常有用的。
代码贡献的主要规则
有些规则你必须遵守,以成功地通过代码审查,贡献高质量的代码。
如何安装我的环境?
OSTF 的仓库位于 Stackforge: https://github.com/stackforge/fuel-ostf。你还需要安装并连接 gerrit,因为如果不这样,你是无法贡献代码的。你需要根据 https://wiki.openstack.org/wiki/CLA#Contributors_License_Agreement 中的注册和安装指南来完成相应步骤,完成后,你就可以准备开始修改/创建代码了。
我的模块看起来应该是什么样子呢?
规则很简单:
- 遵守 Python 的编码规则
- 遵守 OpenStack 贡献者的规则
- 注意错误代码
- 遵守正确的测试体系
- 在你写完代码而发送 review 之前,要执行你的测试
我们所说的遵守 Python 编码的规则,你可以在这里找到样式指南:https://www.python.org/dev/peps/pep-0008/。你应该仔细地把它阅读一次,而且,你需要在完成代码后执行一些检查,以保证你的代码符合标准。没有更正代码标准问题的话,你的代码是不能被合并到 master 中的。
你需要遵守以下实施规则:
- 以 “test” 开头的字段命名测试模块、测试类和测试方法
- 如果你有一些需要以特定顺序执行,请为方法名称添加序号,例如:test_001_create_keypair
- 从 mixins 中通过给定失败步骤的参数来使用 verify(), verify_response_body_content() 等方法 (请参考 OSTF 包的结构的 fuel_health/common/test_mixins.py 小节)
- 始终在 Scenario 小节的 docstring 中列出所有你使用 test_mixins 方法来验证的正确顺序的步骤
- 当你想检查一个操作是否会进入无限循环时,始终使用 verify() 方法来验证
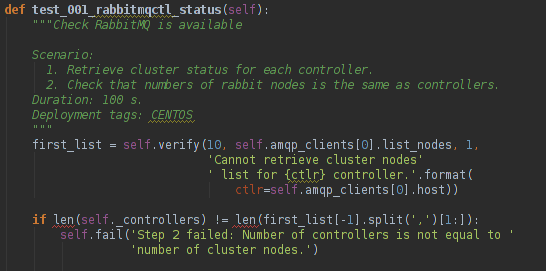
test docstring 是另一个重要的部分,你要始终坚持下列 docstring 的结构:
- test title - 测试标题:始终会在 UI (docstring 的提醒部分只有在测试失败时才会显示) 上显示的测试的描述
- target compent (optional) - 目标组件:所测试的组件的名称 (例如,Nova, Keystone 等)
- blank line - 空行
-
test scenario (测试场景),例如:
Scenario: 1. Create a new small-size volume. 2. Wait for volume status to become "available". 3. Check volume has correct name. 4. Create new instance. 5. Wait for "Active" status. 6. Attach volume to an instance. 7. Check volume status is "in use". 8. Get information on the created volume by its id. 9. Detach volume from the instance. 10. Check volume has "available" status. 11. Delete volume. - test duration - 测试持续时间:对一个测试所消耗时间的估计
- deployment tags (optional) - 部署环境的标签:给定将运行什么样测试的环境的信息(可用的值有:CENTOS, Ubuntu, RHEL nova_network, Heat, Murano, Sahara)
以下是一个使用了上述解释的例子:

测试运行顺序和配置集
每个测试集 (sanity, smoke, ha 和 platform_tests) 在 __init__.py 模块中都包含一个特定的变量,称为 __profile__ 。profile 变量使设置不同的规则成为可能,例如测试执行顺序、部署环境标签、清理时的信息收集和运行一个测试的预期时间的估计。
如果你正在开发一套新的测试,你需要创建 __init__.py 模块并替换其中的 __profile__ 字典。让你的配置集符合以下结构是非常重要的:
__profile__ = {
    "test_runs_ordering_priority": 4,
    "id": "platform_tests",
    "driver": "nose",
    "test_path": "fuel_health/tests/platform_tests",
    "description": ("Platform services functional tests."
                    " Duration 3 min - 60 min"),
    "cleanup_path": "fuel_health.cleanup",
    "deployment_tags": ['additional_components'],
    "exclusive_testsets": []
    }
注意配置集中的每个每个字段,以及可接受的变量。
- test_runs_ordering_priority 是一个负责设置要显示的优先级的字段,例如,如果你把 sanity 测试设置为 “6” 而把 smoke 测试设置为 “3”,smoke 测试会优先显示在 HealthCheck 标签上;
- id 只是测试集的唯一标识;
- driver 字段用来设置 test ruuner;
- test_path 是一个 “fuel_health” 字典中的代表了测试集存放位置的字符串字段;
- description 是一个包含了测试过程中显示在 UI 上的值的字段;
- cleanup_path 是一个指定了模块所负责清理的机制的路径(如果你没有指定这个值,执行完你的测试集后是不会进行清理工作的);
- deployment_tags 字段用来根据集群设置定义这些测试在什么情况下可用;
- exclusive_testsets 字段给你一个机会来指定要顺序执行的测试集。例如,你可以在配置集中指定 “sanity_smoke”,那么,这些测试就不会同时进行,而是顺序进行。
为每一个属性指定值是必要的。可选的属性为 “deployment_tags”,意味着你完全可以不在配置集中定义它。你可以设置 “exclusive_testsets” 为空 ([]) 以让你的测试同其他测试同时进行。
如何执行我的测试?
最简单的办法是安装 Fuel,那么 OSTF 就会作为它的一部来安装。
- 安装 virtualbox
- 构建 Fuel ISO: Building the Fuel ISO
- 使用 virtualbox 脚本来运行 ISO
- 安装完成后,登录到 Fuel UI (通常是 10.20.0.2:8000) 并新建一个集群,做一些必要的配置
-
执行:
rsync -avz <path to fuel_health>/ root@10.20.0.2:/opt/fuel_plugins/ostf/lib/python2.6/site-packages/fuel_health/ -
执行:
ssh root@10.20.0.2 ps uax | grep supervisor kill <supervisord process number> service supervisord start - 登录到 Fuel UI 并执行你的测试
现在我已经完成了,接下来做什么呢?
- 不要忘记在代码修改的部分执行 pep8 的检查
- 提交你的修改
- 执行 git reveiw
- 在 IRC 上请求 review
在这个部分中,你仅仅需要以同样的步骤修复和提交检查评论(如果有的话)。如果没有留下检查评论,检查的人将会接受你的代码,且会自动合并到 master 分支上。
OSTF 的一般架构
测试被包含到 Fuel 中,因此一旦你在试验环境中安装了 Fuel 你就可以访问到它们。OSTF 架构非常简单,它由以下两个主要的包组成:
- fuel_health: 包含测试集本身及其相关模块
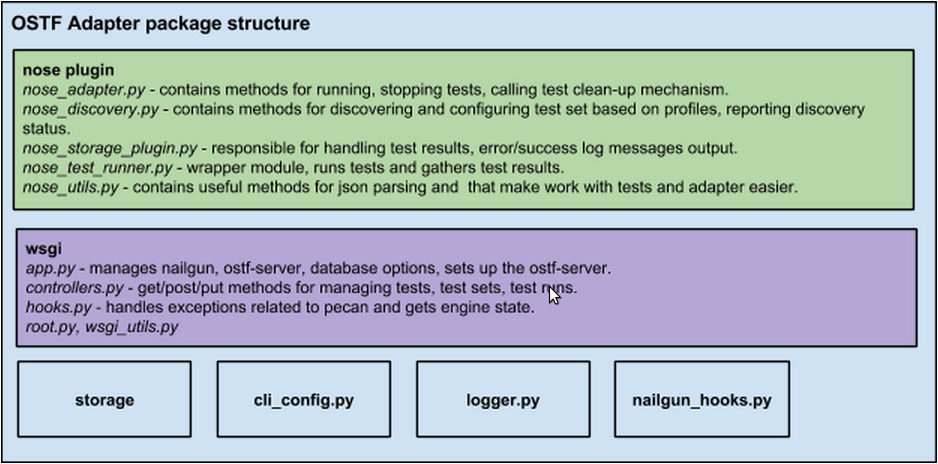
- fuel_plugin: 包含 OSTF-adapter,它在集群部署选项中形成必要的测试列表,并通过 REST_API 传到 UI 上
另一方面,还有一些测试执行本身的信息。有些模块收集信息并把它们解析成测试本身所使用的对象。所有的信息都是从 Nailgun 组件收集的。
OSTF 的 REST api 接口
Fuel OSTF 模块不仅仅提供测试,还提供 RESTful 接口,意味着可以和组件交互。
根据 REST,所有类型的 OSTF 实体都由 3 个 HTTP 动作管理:GET, POST 和 PUT。
下面的基本 URL 是用于向 OSTF 请求的:
{ostf_host}:{ostf_port}/v1/{requested_entity}/{cluster_id}
目前,你可以通过在相应的 ostf_plugin 的 URL 上以 GET 请求获取关于 testsets, tests 和 testruns 的信息。
要获取关于 testsets 的信息,在下列 URL 上发送 GET 请求:
{ostf_host}:{ostf_port}/v1/testsets/{cluster_id}
要获取关于 tests 的信息,在下列 URL 上发送 GET 请求:
{ostf_host}:{ostf_port}/v1/tests/{cluster_id}
要获取关于执行测试的信息,在下列 URL 上发送 GET 请求:
-
对于整个 testruns 集合:
{ostf_host}:{ostf_port}/v1/testruns/ -
对于特定的 testrun:
{ostf_host}:{ostf_port}/v1/testruns/{testrun_id} -
对于在某个特定集群上的 testruns 执行列表:
{ostf_host}:{ostf_port}/v1/testruns/last/{cluster_id}要执行一个测试,在下列 URL 上发送 POST 请求:
{ostf_host}:{ostf_port}/v1/testruns/
body 必须由包含 testsets 和属于它的要执行的 tests 列表的 JSON 数据结构组成。它还应该有关于集群信息的 metadata (关键字 “cluster_id” 用来保存参数值):
[
    {
        "testset": "test_set_name",
        "tests": ["module.path.to.test.1", ..., "module.path.to.test.n"],
        "metadata": {"cluster_id": id}
    },

    ...,

    {...}, # info for another testrun
    {...},

    ...,

    {...}
]
如果成功了,OSTF adapter 会以 JSON 的格式返回所创建的 testrun 实体的属性值。如果你只想启动一个测试,那么就将它的 id 放到列表里。要启动所有的测试,就把列表置空 (这是默认值)。响应的示例:
[
    {
        "status": "running",
        "testset": "sanity",
        "meta": null,
        "ended_at": "2014-12-12 15:31:54.528773",
        "started_at": "2014-12-12 15:31:41.481071",
        "cluster_id": 1,
        "id": 1,
        "tests": [.....info on tests.....]
    },

    ....
]
你可以停止和重新启动 testruns。你需要向 testruns 发送 PUT 请求。请求的 body 必须包含要停止或重启的 testruns 和 tests 的列表。例如:
[
    {
        "id": test_run_id,
        "status": ("stopped" | "restarted"),
        "tests": ["module.path.to.test.1", ..., "module.path.to.test.n"]
    },

    ...,

    {...}, # info for another testrun
    {...},

    ...,

    {...}
]
如果成功,OSTF adapter 会以 JSON 的格式返回所执行的 testsets 的属性值。它的结构和 POST 请求是一样的,正如上面所给的例子那样。
OSTF 包的架构
在 fuel_health 包中所使用的主要模块为:
config 模块负责获取测试所需要的数据。所有的数据都是从 Nailgun 组件或者一个 text config 中收集到的。
Nailgun 给我们提供了下列数据:
- OpenStack admin user name
- OpenStack admin user password
- OpenStack admin user tenant
- controller 节点的 ip
- compute 节点的 ip - 通过解析 json 返回的 role 关键字可以很容易地从 nailgun 数据中获得这个数据
- 部署模式 (HA /non-HA)
- 部署的操作系统 (RHEL/CENTOS)
- keystone / horizon urls
- tiny proxy address
所有我们所需要的其他信息存储在 config.py 中并在这个情况下保持默认值。如果你使用从 Nailgun (通过 Fuel 安装的 OpenStack) 获取的数据,你需要进行以下操作:初始化 NailgunConfig() 类。
Nailgun 运行在 Fuel master 节点上,因此你可以通过调用 curl http:/localhost:8000/api/<uri_here> 很容易地获取到每个集群的数据。集群 id 可以从 OS 环境 (由 Fuel 提供) 获得。
如果你想在不安装 Fuel 的情况下运行 OSTF,请将 NailgunConfig() 的初始化修改为 FileConfig(),并设置在 config 中被标记为绿色的参数 - 请看附录1 (默认配置文件路径 fuel_health/etc/test.conf)
cleanup.py - 当用户在 Web UI 上执行了停止测试的操作时,被 OSTF 调用。这个模块负责删除在测试套件运行期间所创建的所有资源。它只是简单地找到所有以 “ost1_test-“ 开头的资源并使用 _delete_it 方法将其销毁。
重要:
如果你要为这个资源添加额外的清理,你必须记住:所有的资源都是相互依赖的,这就是删除一个正在使用的资源时会给你一个 exeption 的原因;不要忘记删除资源时需要使用每个资源的 ID 而不是 name。你需要在 _delete_it 中指定 delete_type 选项为 ‘id’。
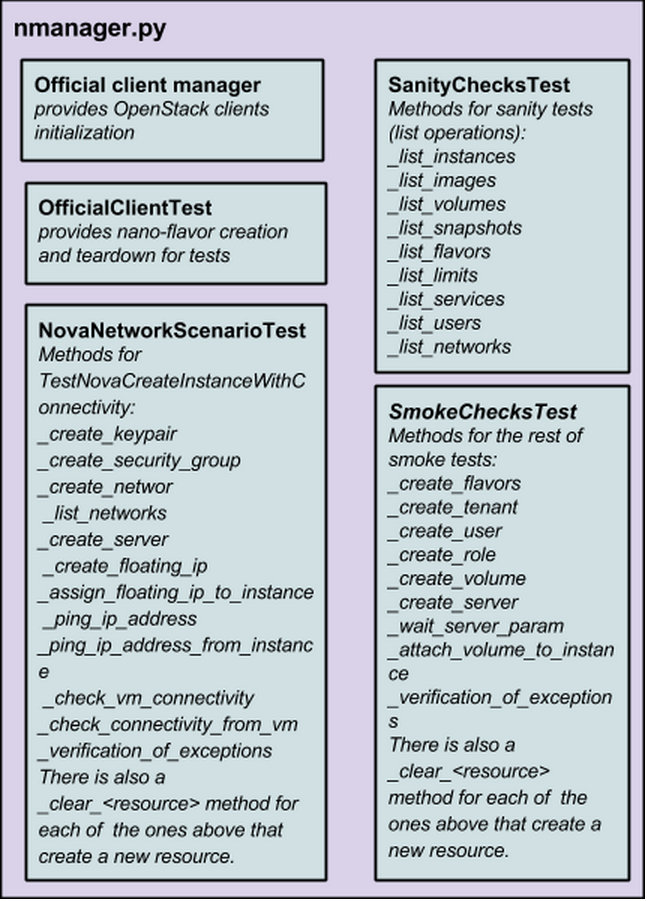
nmanager.py - 包含测试的基类。每个基类包含 setup, teardown 和其他在 tests 和 OpenStack python client 之间扮演交互层角色的方法 (请看 nmanager 架构图)。

fuel_health/common/test_mixins.py - 提供 mixins 以打包回应的验证为 human-readable 的消息。在测试失败的情况下,这个方法需要一个失败的步骤和一个可描述的信息。verify() 方法也需要设置一个 timeout 的值。这个方法在检查 OpenStack 操作(例如:实例的创建)时被用到。有时候一个集群的操作花费了过长的时间可能是一个问题,因此这可以防止测试进入在这种情况或无限循环。
fuel_health/common/ssh.py - 提供一个简单的途径来 ssh 到节点或实例中。这个模块使用 paramiko library 且包含了一些有用的封装,可以为你创建常规任务(例如:ssh key 的验证、启动传输进程等)。而且,它还包含一个更加有用的方法 exec_command_on_vm(),它可以通过 controller 节点创建一个 ssh 连接到实例中,并在其中执行一些必要的命令。
OSTF adapter 的架构

需要记住的关于 OSTF Adapter 的重要事情是:正如编写测试那样,所有的代码都需要遵守 pep8 标准。
附录1
IdentityGroup = [
    cfg.StrOpt('catalog_type',
        default='identity', may be changes on keystone
        help="Catalog type of the Identity service."),
    cfg.BoolOpt('disable_ssl_certificate_validation',
        default=False,
        help="Set to True if using self-signed SSL certificates."),
    cfg.StrOpt('uri',
        default='http://localhost/' (If you are using FileConfig set  here appropriate address)
        help="Full URI of the OpenStack Identity API (Keystone), v2"),
    cfg.StrOpt('url',
        default='http://localhost:5000/v2.0/', (If you are using FileConfig set  here appropriate address to horizon)
        help="Dashboard Openstack url, v2"),
    cfg.StrOpt('uri_v3',
        help='Full URI of the OpenStack Identity API (Keystone), v3'),
    cfg.StrOpt('strategy',
        default='keystone',
        help="Which auth method does the environment use? "
             "(basic|keystone)"),
    cfg.StrOpt('region',
        default='RegionOne',
        help="The identity region name to use."),
    cfg.StrOpt('admin_username',
        default='nova' , (If you are using FileConfig set appropriate value here)
        help="Administrative Username to use for"
             "Keystone API requests."),
    cfg.StrOpt('admin_tenant_name', (If you are using FileConfig set appropriate value here)
        default='service',
        help="Administrative Tenant name to use for Keystone API "
             "requests."),
    cfg.StrOpt('admin_password', (If you are using FileConfig set appropriate value here)
        default='nova',
        help="API key to use when authenticating as admin.",
        secret=True),
    ]

ComputeGroup = [
    cfg.BoolOpt('allow_tenant_isolation',
        default=False,
        help="Allows test cases to create/destroy tenants and "
             "users. This option enables isolated test cases and "
             "better parallel execution, but also requires that "
             "OpenStack Identity API admin credentials are known."),
    cfg.BoolOpt('allow_tenant_reuse',
        default=True,
        help="If allow_tenant_isolation is True and a tenant that "
             "would be created for a given test already exists (such "
             "as from a previously-failed run), re-use that tenant "
             "instead of failing because of the conflict. Note that "
             "this would result in the tenant being deleted at the "
             "end of a subsequent successful run."),
    cfg.StrOpt('image_ssh_user',
        default="root", (If you are using FileConfig set appropriate value here)
        help="User name used to authenticate to an instance."),
    cfg.StrOpt('image_alt_ssh_user',
        default="root", (If you are using FileConfig set appropriate value here)
        help="User name used to authenticate to an instance using "
             "the alternate image."),
    cfg.BoolOpt('create_image_enabled',
        default=True,
        help="Does the test environment support snapshots?"),
    cfg.IntOpt('build_interval',
        default=10,
        help="Time in seconds between build status checks."),
    cfg.IntOpt('build_timeout',
        default=160,
        help="Timeout in seconds to wait for an instance to build."),
    cfg.BoolOpt('run_ssh',
        default=False,
        help="Does the test environment support snapshots?"),
    cfg.StrOpt('ssh_user',
        default='root', (If you are using FileConfig set appropriate value here)
        help="User name used to authenticate to an instance."),
    cfg.IntOpt('ssh_timeout',
        default=50,
        help="Timeout in seconds to wait for authentication to "
             "succeed."),
    cfg.IntOpt('ssh_channel_timeout',
        default=20,
        help="Timeout in seconds to wait for output from ssh "
             "channel."),
    cfg.IntOpt('ip_version_for_ssh',
        default=4,
        help="IP version used for SSH connections."),
    cfg.StrOpt('catalog_type',
        default='compute',
        help="Catalog type of the Compute service."),
    cfg.StrOpt('path_to_private_key',
        default='/root/.ssh/id_rsa', (If you are using FileConfig set appropriate value here)
        help="Path to a private key file for SSH access to remote "
             "hosts"),
    cfg.ListOpt('controller_nodes',
        default=[], (If you are using FileConfig set appropriate value here)
        help="IP addresses of controller nodes"),
    cfg.ListOpt('compute_nodes',
        default=[], (If you are using FileConfig set appropriate value here)
        help="IP addresses of compute nodes"),
    cfg.StrOpt('controller_node_ssh_user',
        default='root', (If you are using FileConfig set appropriate value here)
        help="ssh user of one of the controller nodes"),
    cfg.StrOpt('controller_node_ssh_password',
        default='r00tme', (If you are using FileConfig set appropriate value here)
        help="ssh user pass of one of the controller nodes"),
    cfg.StrOpt('image_name',
        default="TestVM", (If you are using FileConfig set appropriate value here)
        help="Valid secondary image reference to be used in tests."),
    cfg.StrOpt('deployment_mode',
        default="ha", (If you are using FileConfig set appropriate value here)
        help="Deployments mode"),
    cfg.StrOpt('deployment_os',
        default="RHEL", (If you are using FileConfig set appropriate value here)
        help="Deployments os"),
    cfg.IntOpt('flavor_ref',
        default=42,
        help="Valid primary flavor to use in tests."),
]


ImageGroup = [
    cfg.StrOpt('api_version',
        default='1',
        help="Version of the API"),
    cfg.StrOpt('catalog_type',
        default='image',
        help='Catalog type of the Image service.'),
    cfg.StrOpt('http_image',
        default='http://download.cirros-cloud.net/0.3.1/'
                'cirros-0.3.1-x86_64-uec.tar.gz',
        help='http accessable image')
]

NetworkGroup = [
    cfg.StrOpt('catalog_type',
        default='network',
        help='Catalog type of the Network service.'),
    cfg.StrOpt('tenant_network_cidr',
        default="10.100.0.0/16",
        help="The cidr block to allocate tenant networks from"),
    cfg.IntOpt('tenant_network_mask_bits',
        default=29,
        help="The mask bits for tenant networks"),
    cfg.BoolOpt('tenant_networks_reachable',
        default=True,
        help="Whether tenant network connectivity should be "
             "evaluated directly"),
    cfg.BoolOpt('neutron_available',
        default=False,
        help="Whether or not neutron is expected to be available"),
]

VolumeGroup = [
    cfg.IntOpt('build_interval',
        default=10,
        help='Time in seconds between volume availability checks.'),
    cfg.IntOpt('build_timeout',
        default=180,
        help='Timeout in seconds to wait for a volume to become'
             'available.'),
    cfg.StrOpt('catalog_type',
        default='volume',
        help="Catalog type of the Volume Service"),
    cfg.BoolOpt('cinder_node_exist',
        default=True,
        help="Allow to run tests if cinder exist"),
    cfg.BoolOpt('multi_backend_enabled',
        default=False,
        help="Runs Cinder multi-backend test (requires 2 backends)"),
    cfg.StrOpt('backend1_name',
        default='BACKEND_1',
        help="Name of the backend1 (must be declared in cinder.conf)"),
    cfg.StrOpt('backend2_name',
        default='BACKEND_2',
        help="Name of the backend2 (must be declared in cinder.conf)"),
]

ObjectStoreConfig = [
    cfg.StrOpt('catalog_type',
        default='object-store',
        help="Catalog type of the Object-Storage service."),
    cfg.StrOpt('container_sync_timeout',
        default=120,
        help="Number of seconds to time on waiting for a container"
             "to container synchronization complete."),
    cfg.StrOpt('container_sync_interval',
        default=5,
        help="Number of seconds to wait while looping to check the"
             "status of a container to container synchronization"),
]
